One of the ultimate goals of every 3D artist is to model a realistic human face. To acquire the natural look we have to make the best out of every step we do: from collected references, planning before modeling, texturing, and rendering. I will pay more attention to upper level things such as workflow; different method in modeling; topology; and common mistakes. We'll focus more on making a realistic head model to be used in animation.
2. Pre-modeling
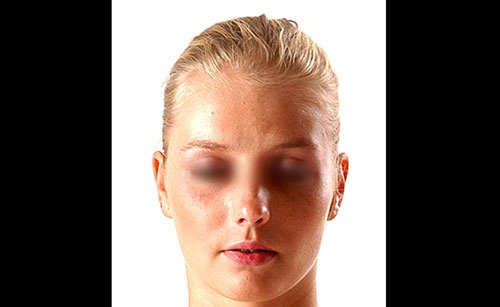
The important thing in this component is the precision and quality of reference photographs or concept art. If we make mistake in this process, we might face problem in modeling when we realize that the model fit with the front view while the side view does not fit. Or there is chance that our model look precisely fit in orthographic view but in perspective view it doesn't look like the person in reference. This will consume a lot of time to fix once we have moved into modeling phase.
In taking photograph of a person for references, it is important to take pictures at the correct angle or else we'll be wasting time adjusting the mesh to make it look right. We should take into consideration our camera's focal length. The longer our focal length is, the more preponderant reference photographs we get. Remember we cannot get orthographic photograph due to distortion of view angle. The model usually get thicker (as we build it in 3d) than our reference but we can always fix it in the perspective view. The other thing we need to consider is even lighting. Avoid losing details because of too strong or too low lighting condition.
Before we import our references in our 3d application, make sure that the images fit with each other. Correct the reference images in Photoshop or any image editing software.
3. Edge planning and Topology
Plan before you start modeling or else you'll get confused by too many edge loop and unnecessary poly faces. Sketch out first the main shape of the head then the base. From here we start to plan the edge structure. Having a good flow of topology is one of the main key of successful modeling. In animation, the head have more screen time, so high detail or good flow of topology makes can make it more accurate and natural.
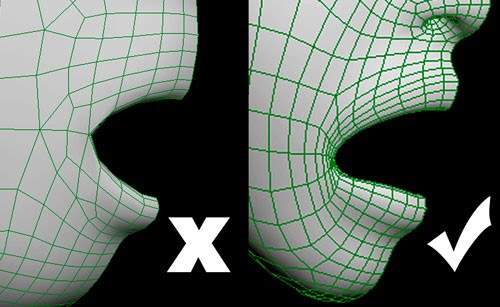
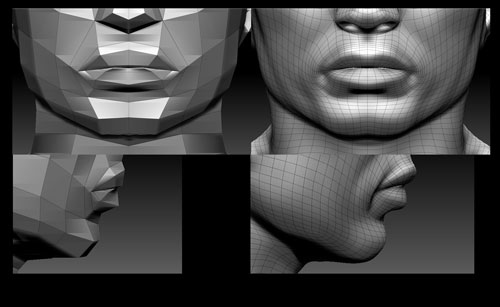
This is an example on how a defective configuration affects your cinematography deformer. Due to poor skinning and topology, the polygonal shape at the backtalk guide are being study as bad as they can.
This is image show the effects of bad topology while animating. Most of the time, with a good topology we can achieve decent result with less poly count.
3.1 Human Face Topology
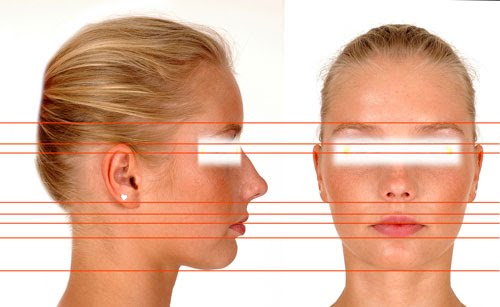
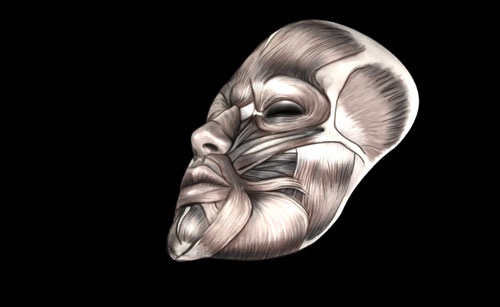
How to know what is good and bad topology? The answer is to check the human face anatomy. As you can see, the shape of the human head, wrinkles as well as expressions are formed by muscles and shape of skull, the muscle that create the "smile lines".
How facial muscles work: Muscles work like strings attached to the skin surface which is our model. But we should study much of the movement and shape of the outside skin not the muscle. We usually base the topology on the wrinkles which are formed by facial muscle. knowledge of facial anatomy would be a plus but do not over do it. It is better to exaggerate the wrinkles of our references and start building the topology upon that.
3.2 Topology
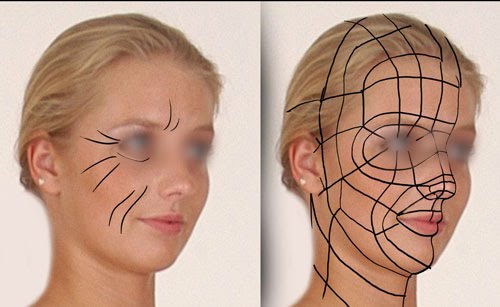
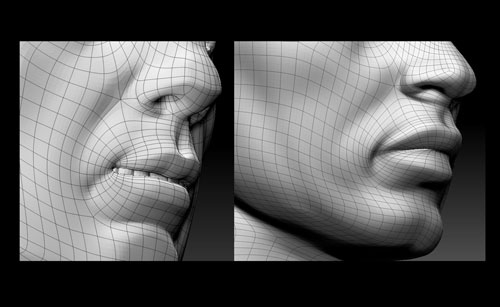
This is a good example on how we should sketch out our topology with reference images, we start with the most identifiable wrinkles then build up intersected edge flows from there. 99% of human faces are identical to each other in anatomy, so the topology would not differ much.
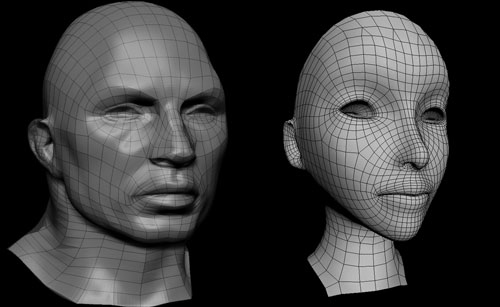
Here is an example of good and bad face topology:
In here, we can perceive that, in the good topology example each model has a small difference topology but they still base on the same concept. - Humans are genetically the same. The face lines may look different, but we all have the same underlying topology. It's like lines in the hands of our palms, they are all different but very similar. - On men, the common doubled-semi-colon shape that's created by the smile lines as they run into the chin, together with the next wrinkle parallel to it. Almost everyone of us shows something like that, although some we can find their smile lines a bit lower on the chin. Know that there is no looping structure in our human face, as we can see in our reference, breaking our face structure into edge loop is for sufficient and simplification of polygon topology. There is no absolute correct face or head topology in 3d, It is only approximated. It depended on the reference and for modeling purposes only.
3.3 Rules for Modeling
The rule for human face modeling is the same as other objects:
- Keep resolution as low as possible or keep polycount low.
- Use 4 sides as much as possible and use triangle when its only needed, triangles saves us unnecessary edge loop and faces.
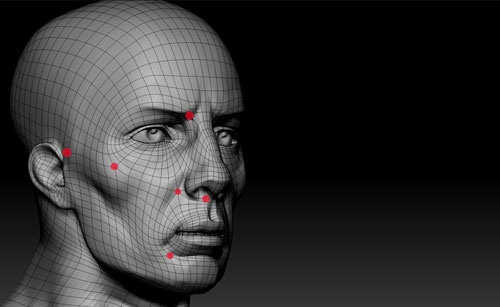
- Avoid poles or using more than 4 sides. But we may sometime use poles in area that are less seen in the model. The effect of poles is usually they are not smoothed properly.
These are some area that usually have pole and they are acceptable.
- Polygon should always be square, no long thin nor diamond shaped but you can use it in wrinkles area.
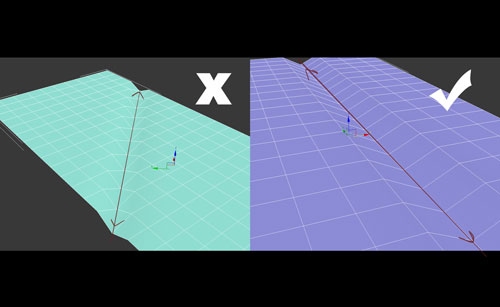
- The edge direction should not run across from surface. The worst case is working on topology running at 45 degrees.
- It is also important to balance between enough detail to achieve what is needed and build the model as low poly count as possible.
The more detailed we have, the more accurate and realistic our model can be but then it will be more difficult on editing. This applies to both still image and animation. With still image sometimes it's okay but it's a good practice to keep the model light and low res. For extra details, use normal and displacement map instead.
4. Modeling
There are many way of modeling a human face, you can choose your own comfortable way to do model. Following is some of the method.
4.1 Polygon Modeling
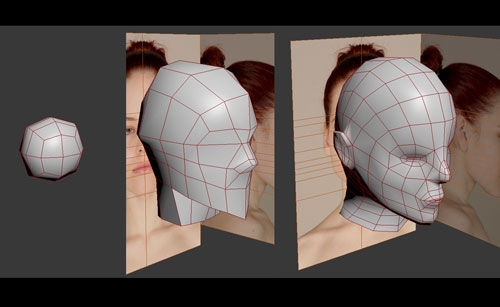
Polygon modeling is the basic and straight forward modeling method. Here are the basic steps: - Start from primitive shape like cube or sphere. Block out the overall shape of the head first and delete some unnecessary face and edge loop to form a basic topology and then work into detail by adding more edge and face around area like eye, nose, mouth etc.
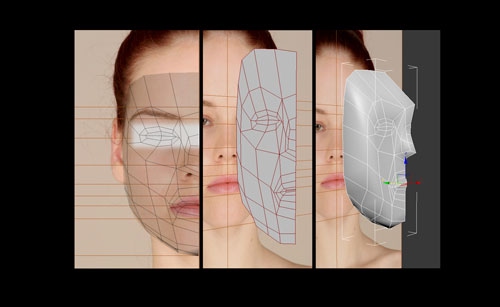
- Start from curve/lines. Some prefer to draw curves that run along the prominent lines of the reference images, then edit these lines to form a basic head shape. After that, extrude around the lines and start building separated parts of the face and then connect them together when its done and continue adjusting the object until you get the form of a completed face.
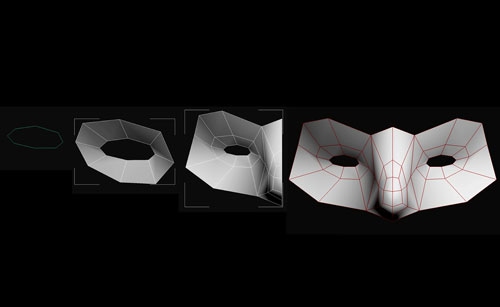
You can also start creating human face using plane.
4.2 Sub-D Modeling
This can also be called polygon modeling. Few choose this method to work with. From the start, it is the same as polygon modeling, once we have our basic head model, we can go into detail by sub-dividing one more level to have more vertex for editing. This gives us the easy way of adjust the overall shape of the object by editing at the lowest level of the mesh or object. It also prevents us from getting easily confused by the details kept in higher level
4.3 Nurb Modeling
Nurb is great for modeling automotives, accurate surfaces, and symmetrical objects but can be used for other organic objects as well. This will require good understanding of nurbs. It will be a hard work working with details. The common workflow is we usually make the basic head model in NURB and then convert it to polygon, and we can chose either SUB-D or polygon modeling.
4.4 Zbrush/Mudbox Sculpting Modeling
Zbrush/Mudbox are 3d sculpting softwares that can be used to model a human head beginning from a zsphere or any rough head model and then continue with the details. After we are done with the details, we can use the retopology tool in Zbrush or resurface it with new topology in 3ds Max to create a lower poly count model but still keeping the similar look of our high res model.
The advantage is we can detail our head model up to millions of polygon, and the job of modeling and topology is separated. This means we can focus on one thing at a time. We can create normal map, cavity map, displacement map, diffuse map, etc. These will help us a lot in texturing work later.
Disadvantages of this method is it will take a lot a time. We have to create both super high res model and low res model. Also, we need a good sculpting skill in order to sculpt high res model with details, These are the few disadvantages so far I can find. Overall, I think it is really good and being used by many people nowadays.
Among all the modeling method, I am comfortable with the basic polygon modeling which I use to create the base object in 3d Max and then bring it into Zbrush for sculpting and re-topology. Next, I export it to the lowest level mesh in Zbrush back in to Max and apply maps created in Zbrush like displacement map, cavity map, normal map, diffuse map...etc to make it look high res model in Zbrush.
5. Tips
Whatever modeling method we use, these are some areas of the face we should watch out.
5.1 Eye areas
They are the ultimate important element in 2D painting as well as 3D. Viewers always look at the eyes of character first. It is the eyes that shows the most characteristic out of the face. It is reasonable to spend extra time for the eyes.
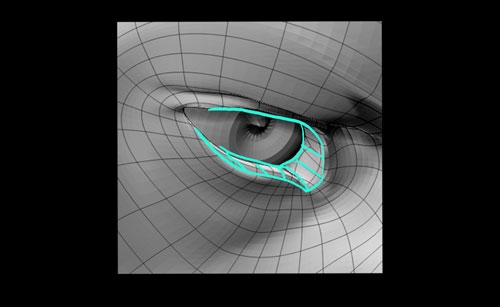
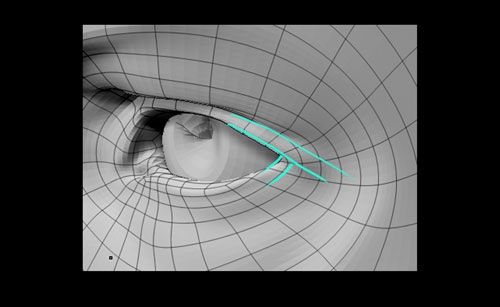
It's better to use a sphere as reference to model the eye lids to make it look natural.
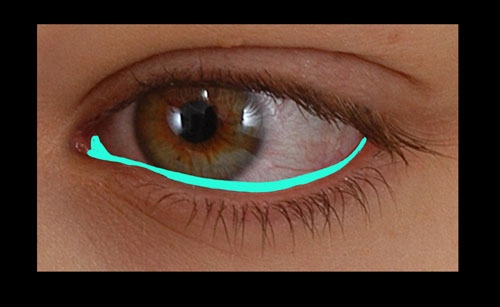
The eye lids are mainly two curves that formed by upper and lower eyelids. Create some extra edge loop inward to make the thickness of the eyelids.
The eye's canthus should also be modeled so the eyeball will fit in the eye holes. Do not model it separately or else it will look like a dirt in the eye. It is better to model them as one.
Others often make mistake when making an absolute edge loop around eye areas, we should have a line go out from the outside eye corners instead.
These small details seem not to be noticeable from distance, but in close up scene it makes the eyes look much more realistic.
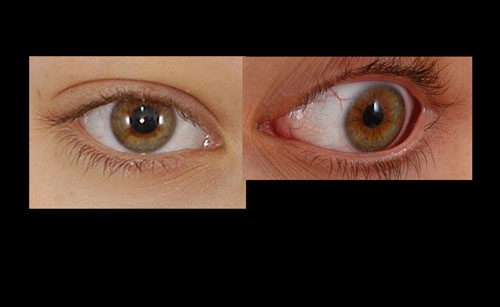
5.2 Eye balls
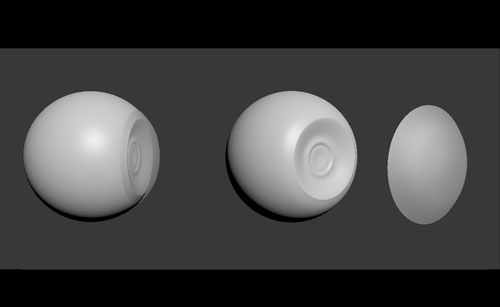
Most people use a single simple sphere to create the eyeball, This makes the eye look unnatural or like a doll. Observing the eyeball, it looks much deeper and glossier. the key to a realistic eyeball is to mimic the real anatomy of an eyeball. There are 2 parts we need to model:
- the cornea and the eyeball
The cornea is like a sphere but more bent forward at the center, and it's transparency with only catch specular, reflection and even refraction. The eyeball is a sphere but sunken inward at the center to form the iris. This detail modeling can make our model's eyes believable.
The water part between the eyelid and eyeball should also be modeled to give more realistic looking eyes.
5.3 Eyelash and tears
The important thing is the shape of eye lashes. The shade is depended on the many elements of the eye lashes.
Remember to get the correct amount of bunching and randomness in both length and placement. The lower lid's lashes tend to bunch in smaller numbers, while the upper lid's lashes bunch in greater numbers. The small membrane on the inner corner of the eyelids, it is one of the most important elements of the eyes. It is known as caruncula lacrimalis.
Most will use image plane to create eye lashes and texture on it. This will make the eye lashes look flat and not good enough in close-up shots. Some people use Hair & Fur in Max or Hair plugin to make this, but it 's still not really good for close-up. I find out that the best way to do eye lashes is: polygon eye lashes! Despite what method we use the output should be polygon. Polygon eye lashes have a better look with more depth feeling and cast nicer shadows.
We can use 3d Max paintFX or other plugin to create the eye slashes then convert to polygon. This way I can still render the eyelash properly in polygon form. We can also modify the randomness, the thickness as well as the number of strands.
As the number of eye lashes is small around roughly 350 strands, converting it to polygon is not a big problem nowadays. If we want to animate without lagging, we can make it invisible since it's a minor part in animation.
5.4 Nose and lips
Both nose and lips contain some of the most subtle variations in shape on the faces. The key is to understand the planes and angles they flow upon the underlying bones and muscles.
In the nose area:
The edge loop should go around the nose. Avoid the grid-like edge loop, it makes the nose look square and big. The edge around the nose area form a round curve starts from top of the nose and go along, and terminate at area where Philtrum meet nostrils.
To avoid the mouth look like being cut, there should have at least 2 edge loops going out the lip's corner. Add extra edge loop around the lips area to emphasis the shape of the lips. This will smooth out the lip when subdivide or smooth modifier is added. It also better to add extra face loop inside the mouth in case the character opens his mouth.
5.5 Chin
At the chin area, we should terminate edge that run from above with a square polygons area. This topology will make us adjust the shape of the chin easier. We should also have an edge
loop start from chin and terminate at ear, this will form our character's jaw bone nicely.
5.6 Ears
The ear is a very tricky area in the face, it has lot of details inside. Most people model the ear separately and connect them with the head. We can hide some triangle behind the ear, since they are not usually exposed. Remember that we can reuse the ear model for another character.
6. Optimizing
Always review our topology one more time before moving to next step to check for unnecessary edge loop, triangles etc. Keep the topology of the model as symmetrical as possible unless the half of the face is altered. This will help us a lot in UV and texturing.
Animation:
- Review or check whether our character's face will have a good deformation when doing expressions.
- Model the inside wall of the mouth if ever the character is going to open his mouth.
- Put extra edge loop on the upper eye lids area so we will have enough polygon for the eyelid to cover the eye ball when character closes his eyes.
- Just in case that the character have to frown or make glaring expression, the forehead area will form some wrinkles. Unless if we want to do it by texturing, we can add some extra edge loop on the forehead so that we have enough polygon to make those wrinkles. But this is not really necessary if we don't want such a realistic deformation, remove it, it is always good to have a lighter model.
7. Conclusion
Some may say that facial modeling is a simple task. But the most difficult things are on the details and shape that make up unique characteristic. A small change can make a big difference, It's difficult to say whether the face will look right or wrong or what area of the face needs the adjustment.
To come up with a realistic face, we need to have good texture, shader and lighting. But we can never achieve it without a successfully modeled face from the start.